What Queueing options are available?
For incoming calls you can choose from a range of queuing options as described in Update 4.
These include; Ring All, Round Robin and Random, Top-Down sequential, Longest Idle, Fewest Calls
Queues in Universe now has a VIP function that puts your VIP contacts at the top of a queue when they call in.
There are also two priority groups in Universe. When all agents are busy on calls in priority group 1, additional calls will immediately go to priority group 2 to serve customers.
This Universe Update number 5 shows how to provision the queuing function which is appropriate for your company
Getting Set Up
Only Administrators can add people to queues and select options for these queues. Queues are part of the interactive voice response (IVR) part of Universe.
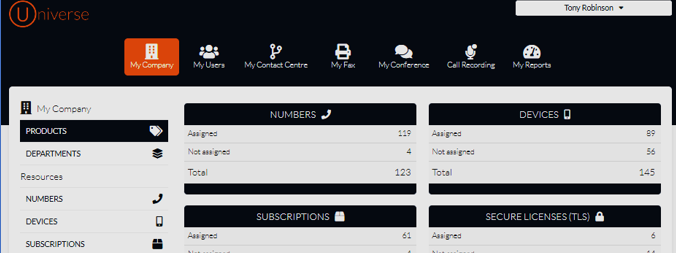
Go to the Universe selfcare portal at https://selfcare.thisisuniverse.io/.
At the top right hand side you will see your name. Click on the drop down box and select “Swap to Administrator view”
A screen like this will appear
Select “My Contact Centre” and then the Edit button for the IVR to which you wish to add a queue. Alternatively create a new IVR.
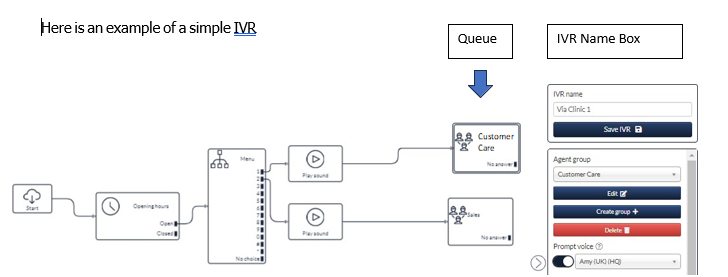
The queue here in the IVR here is titled the “Customer Care” Queue
Select the queue icon and you will see the menu “IVR name” box appear on the right hand side of your screen.
Select Edit in the IVR name box and on the left side of the next screen you will see the names of people in your Universe Phone Book. Down the bottom of the screen you can add external numbers to your queue.
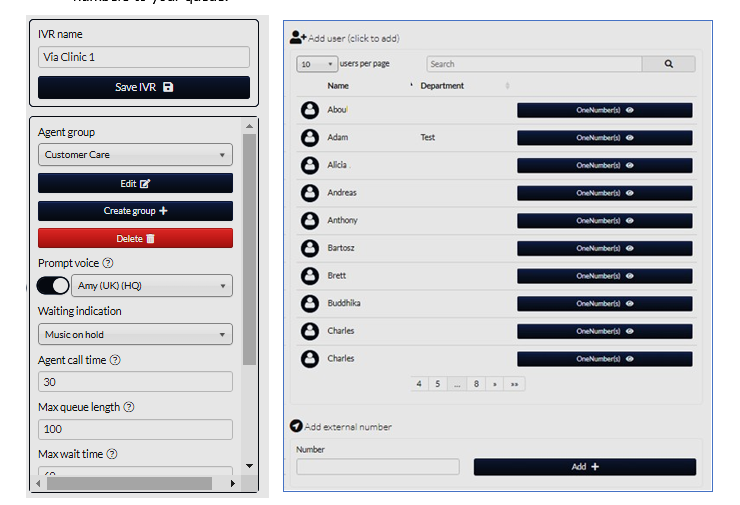
Create Group+ – By selecting this button, a new window will open. On the left-hand side of this window is the Add Users box where you will see the Users that are in your Universe system.
On the right-hand side you will see the Users that are currently active in the specified Queue (see below – Members). To add a User to the queue, click on their name in the Add Users box. To remove them click on the red bin button in the Members box. On the Members box you will also notice two arrows, one pointing up and one pointing down for each agent. These arrows control the order within a group for each User. Pressing down / up will move the Users in the group.
Whenever you make changes in the Agent Group box or your IVR, you have to save it twice,
once at the bottom of the Agent Group box and another in the IVR box “Save IVR”.
External Number – In the Add User box (see above), there is an Add External Number field. To add a non-Universe external number, add it in here. You will however be charged as per your tariff sheet for the calls that are made to that external number from the IVR service. Be

aware that with some mobile providers, when the call in a queue is sent to an external mobile number the incoming call will go to the mobile voicemail. This is important to consider and test when a mobile number is added to a queue.
Priority Groups – To add an extra Priority group, move an agent to the bottom of the group and then press the down arrow. This will create a second group, Priority 2. However, agents in Priority 1 are called first, if no one answers, the agents in Priority 2 are called.
In the General Configuration section in the Members text box you can change the name of the queue, the strategy of the queue and the wrap up time of the queue.
Name – Create a name for your Queue. In this case it is “Customer Care”
Agent Strategy (type of queue) – allows you to choose between six call routing methods; Ring All, Round Robin and Random, Top-Down sequential, Longest Idle, Fewest Calls. Universe Update 4 describes these in detail.
Wrap-up time – is the time in seconds in which the system will wait before it presents a new call to an agent again after a call has finished. Once a User has been placed in a group it will appear in their main Universe page.
Once you have set up the queue in the way in which you would like, press the “Save “or “Save and close window button”.
VIP function – where a customer is considered to be especially important by your company, they can be listed as a VIP. This means that they go to the front of the queue. However, other callers will not be told that their position in the queue has been downgraded.
Upgrading a contact to VIP can be done in both the User View and the Admin View
Simply go to Phone Book => Select the contact you wish to upgrade => slide the button to VIP
=> click the blue box “Update Contact”

Other Updates
To see all the updates for our Universe unified communications product, go to https://firstcom.gdn.agency/updates/